Why do an ionic migration?
Ionic 4 was released in January 2017 and offers many evolutions compared to version 3.
To point out just a few:
- The framework has been completely rebuilt from scratch using standard Web APIs, and each component is packaged as a web component*.
- Unlike Ionic 3, the routing system allows you to have urls and to pass parameters to them, which simplifies navigation, especially for progressive web applications(progressive web app or PWA).
- Upgrade of Angular (from version 5 to version 8), and upgrade of RxJS (from version 5 to version 6), with all their new features.
*This new version therefore has many advantages. It is now possible, thanks to the web components, to create a component on an Ionic application, and to reuse it for example in an Angular application (or vice versa!).
In addition to these new features, a regular upgrade of an application or software is always a good practice, as it allows to solve compatibility and security issues and to take advantage of the latest features of the framework. Application performance is also increased by more than 50%, especially on the initial application loading time.
How to proceed?
Creation of the application with Ionic 4
As the structure of the different folders has greatly evolved, the best way to initialize the migration of Ionic 3 to 4 is to create a new application with the version 4 of Ionic with the command line interface.
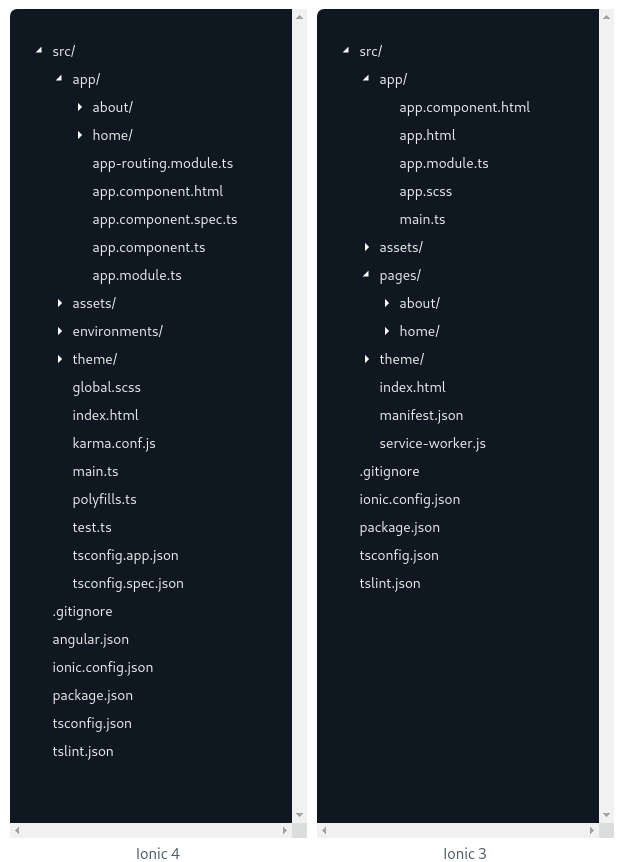
Ionic then recommends copying the contents of the various static elements, including application styles, services or configuration files to the new folders provided in version 4.
Component Migration
The migration of a component takes place in several steps. First, we need to update the view – the html file, its style – then we update the business logic.
Visual migration
The two biggest challenges are then to migrate all the components of version 3 to version 4.
For example, the migration of a single button is as follows: Button migration.
For some data-related components, migration may require a much greater effort, especially for form migration with ion-input.
But the migration, even for a single button, does not stop here! Due to the creation of real web components, the style of the buttons is applied in a different way : this is the shadow DOM.
This brings many advantages: it is possible for example to apply specific styles to a single node of the DOM, without affecting the rest of the application. It is important to take this into account when migrating components because the inside of the shadow root is no longer reachable by external CSS selectors.
The other effect of the switch to web components is that styles applied in version 3 may not necessarily work in version 4 because the render tree is modified. This is probably the longest part of a migration to Ionic 4; the button, stylized with a red color in version 3, will no longer work after the migration:
The generated DOM for version 3:
The generated DOM for version 4:
For this basic example, we use for version 4 the custom properties of the component:
Business Logic Migration
Now that the application’s visuals are consistent with version 3, we make sure that the business logic still works. There are many changes in version 4 of Ionic, especially in the application lifecycle.
The application lifecycle represents different functions that are performed at different stages of application loading. In Ionic 4, the different existing methods are shown below:
For example, the ionViewDidLoad() method has been replaced by the method supported by Angular ngOnInit(). If Ionic code migrated to version 4 is executed in the ionViewDidLoad() method, it will no longer be executed, without generating an error! This example shows that it is important to pay special attention to all points of the migration.
In any case, a general reading of the whole code is required in order to check if the methods of each component are still maintained by the new versions of Ionic, Angular, RxJS…
Best practices
Even if the goal of a migration is not to rewrite the business logic code, we sometimes find ourselves forced to adapt source code that uses functions or plugins that are deprecated or no longer supported by new versions of Ionic nor Angular/RxJS.
This is for example the case of the RxJS throw function which was used to record errors for each HTTP request: this method was therefore duplicated for each request.
In the new versions of Angular, HttpInterceptor is used, which greatly simplifies HTTP error handling, as it records the errors of all application requests in a single function for the entire application.
Migration of cordova plugins to capacitor
Cordova plugins provide access to hardware components of Android and IOS devices. They allow for example to access the camera or GPS coordinates. Migration can be a relatively tedious task because some plugins, developed by the community, are not compatible with Ionic version 4.
For example, we have replaced the cordova-plugin-ionic-webview plugin that zooms into an image with multi-touch with the ionic-img-viewer component that is not a cordova plugin.
With Ionic 4, the Ionic team strongly advises to migrate cordova to capacitor which is an open source solution developed by the Ionic team. With this new framework, plugins will be more PWA / web oriented, unlike cordova plugins which are generally only compatible on iOS and Android. Moreover, cordova is a project maintained by volunteers, and it has recently had difficulties keeping up with the latest changes in native platforms as iOS and Android are constantly undergoing changes, be it new operating system updates or new hardware.
Since the end of 2019, the Apple store says it will soon no longer accept applications that use UIWebView, the webview historically used by cordova. Even though this webview has not been used by cordova for a very short time now, there are still references in some cordova plugins that may prevent a future submission to the Apple app store.
Capacitor uses by default the WKWebView webview which is the webview recommended and not deprecated by Apple.
Our experience feedback
After completing migrations without any particular bottlenecks, we can highlight the following points:
- The clearer and more organized the business logic is, the faster the migration will be
- The more the best practices of version 3 are respected, the faster the migration will be
- Starting from a new Ionic 4 application will always be more efficient than trying to upgrade one by one the different modules via the package node manager.
The official migration guide is available on Ionic’s official website
Don’t hesitate to contact us if you wish to be supported by real ionic experts in your migration process or to carry out a preliminary audit…


One Response